部署也是根据不同的路由模式进行不同情况部署
假设主应用和子应用使用相同模式的路由
不是说使用不同路由不行,而是没那个必要去增加复杂性
我们以本机模拟服务器部署情况
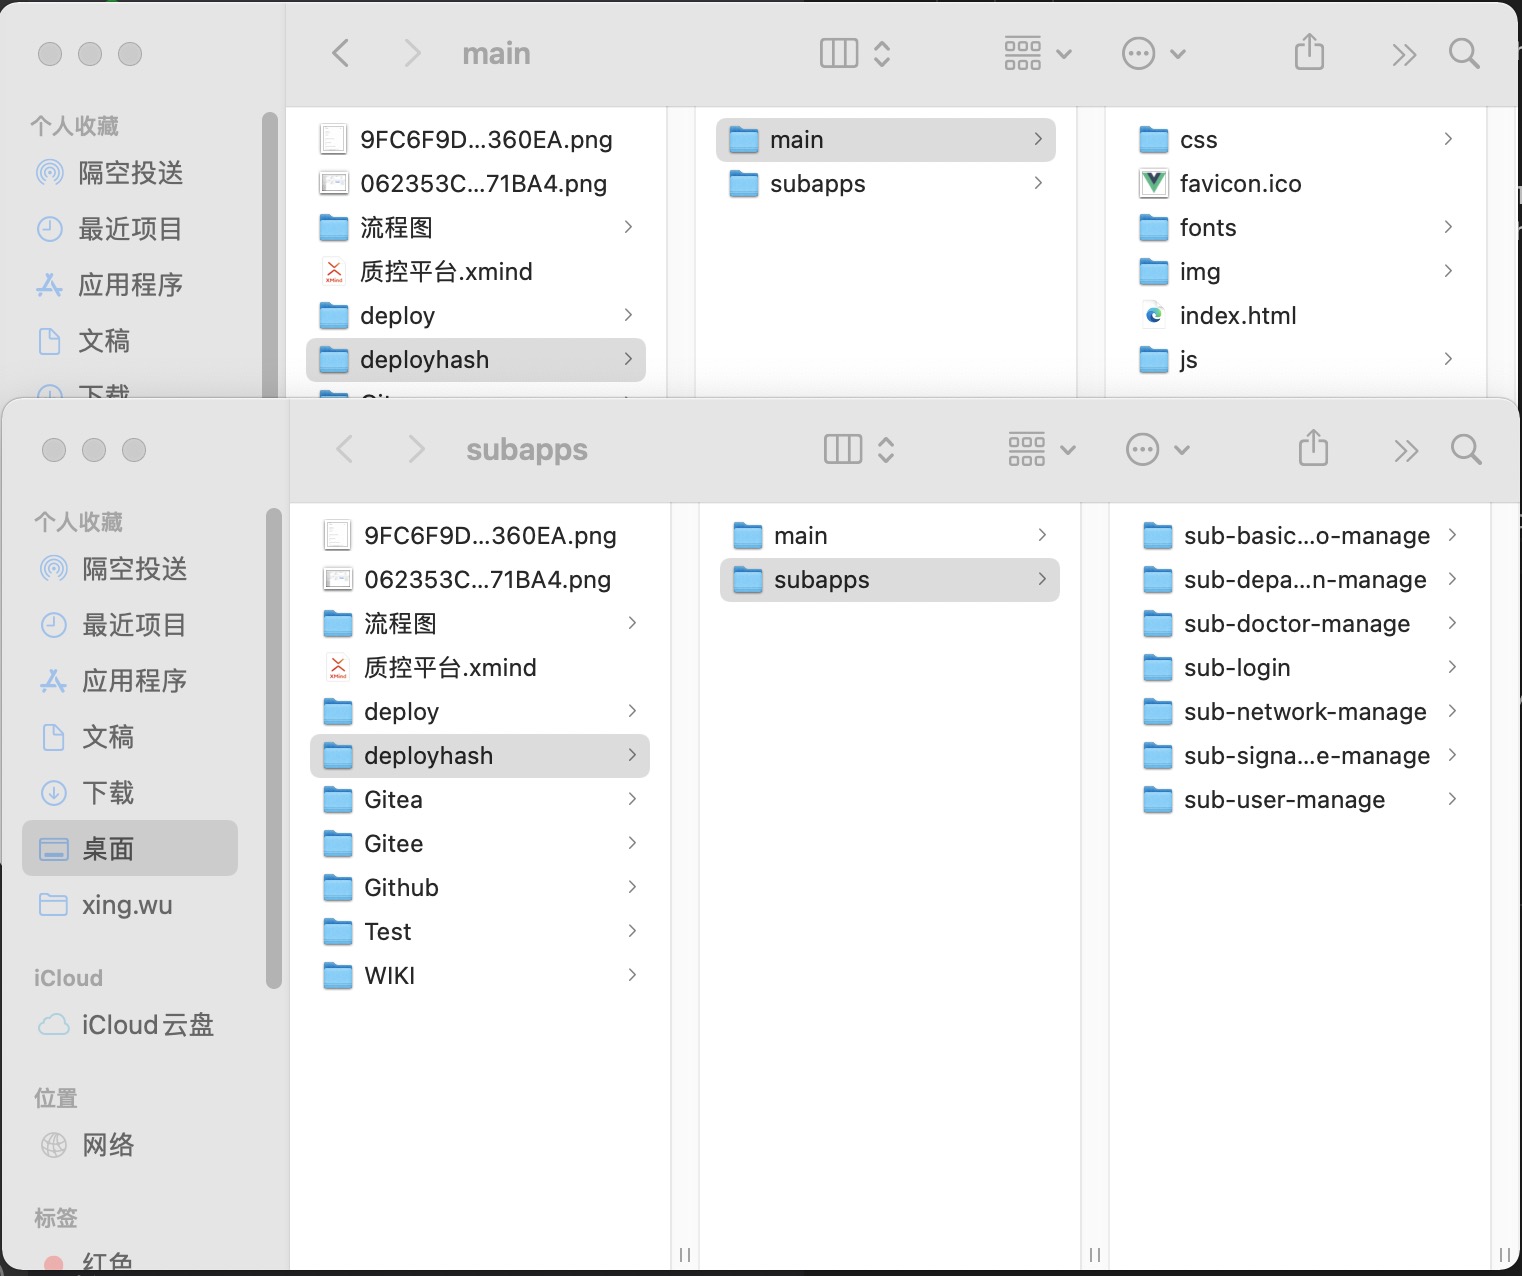
如上图,我打包好了两份代码,分别位于deploy和deployhash文件夹
deploy文件夹内放置的是history模式的产物
deployhash文件夹内放置的是hash模式的产物
两个文件夹内的文件结构是一模一样的,这个图我们叫它图1,等哈记得回头来看
—我是分割线—-
如果选择history模式,子应用需要修改publicPath和routerBasePath,这个不要忘记了
1
2
3
4
|
{
publicPath: process.env.NODE_ENV === 'production' ? `/subapps/${packageName}` : '/',
}
|
1
2
3
4
5
6
|
const setupRouter = () => createRouter({
history: createWebHistory(routeBasePath || process.env.BASE_URL),
routes,
});
|
—我是分割线—-
接下来,我们配置nginx
分别做出两种配置(是的,发现没有,他两除了try_files其实一模一样)
1
2
3
4
5
6
7
8
9
10
11
12
13
14
15
16
17
18
19
20
21
22
23
24
25
26
27
28
29
30
31
|
server {
listen 7777;
server_name localhost;
location / {
root /Users/xing.wu/Desktop/deploy/main;
index index.html index.htm;
try_files $uri $uri/ /index.html;
}
location /subapps {
root /Users/xing.wu/Desktop/deploy;
try_files $uri $uri/ /index.html;
}
}
server {
listen 9999;
server_name localhost;
location / {
root /Users/xing.wu/Desktop/deployhash/main;
index index.html index.htm;
}
location /subapps {
root /Users/xing.wu/Desktop/deployhash;
index index.html index.htm;
}
}
|
接着我们配置需要加载的子应用入口
我是把入口写在了vue的mode文件中区分加载环境
所以这里我就直接写关键的环境文件内容了
(其实两种路由的history配置文件也可以相同,无非是nginx配置了默认访问文件index.html,history可以少写一个index.html)
history
1
2
3
4
5
6
7
| VUE_APP_SUB_LOGIN=/subapps/sub-login/
VUE_APP_SUB_DOCTOR_MANAGE=/subapps/sub-doctor-manage/
VUE_APP_SUB_DEPARTMENT_SIGN_MANAGE=/subapps/sub-department-sign-manage/
VUE_APP_SUB_BASIC_INFO_MANAGE=/subapps/sub-basic-info-manage/
VUE_APP_SUB_NETWORK_MANAGE=/subapps/sub-network-manage/
VUE_APP_SUB_SIGNATURE_MANAGE=/subapps/sub-signature-manage/
VUE_APP_SUB_USER_MANAGE=/subapps/sub-user-manage/
|
hash
1
2
3
4
5
6
7
| VUE_APP_SUB_LOGIN=/subapps/sub-login/index.html
VUE_APP_SUB_DOCTOR_MANAGE=/subapps/sub-doctor-manage/index.html
VUE_APP_SUB_DEPARTMENT_SIGN_MANAGE=/subapps/sub-department-sign-manage/index.html
VUE_APP_SUB_BASIC_INFO_MANAGE=/subapps/sub-basic-info-manage/index.html
VUE_APP_SUB_NETWORK_MANAGE=/subapps/sub-network-manage/index.html
VUE_APP_SUB_SIGNATURE_MANAGE=/subapps/sub-signature-manage/index.html
VUE_APP_SUB_USER_MANAGE=/subapps/sub-user-manage/index.html
|
我们分开解析一下这两份配置
如果对nginx的基本配置不太熟悉的可以查看无星的nginx配置学习(一)-基础配置和无星的nginx配置学习(二)——Vue router history配置引发的思考
history
1.nginx配置
首先,我们需要配置加载主应用
1
2
3
4
5
| location / {
root /Users/xing.wu/Desktop/deploy/main;
index index.html index.htm;
try_files $uri $uri/ /index.html;
}
|
我们访问域名http://localhost:7777/等于访问/Users/xing.wu/Desktop/deploy/main/
且默认访问访问文件index.html
因此,我们访问http://localhost:7777/就等于访问了主应用/Users/xing.wu/Desktop/deploy/main/index.html
其次,我们需要配置加载子应用
1
2
3
4
| location /subapps {
root /Users/xing.wu/Desktop/deploy;
try_files $uri $uri/ /index.html;
}
|
举个例子,我们访问SUB_LOGIN这个子应用,从上述的描述文件可以得到
VUE_APP_SUB_LOGIN的入口地址为/subapps/sub-login/
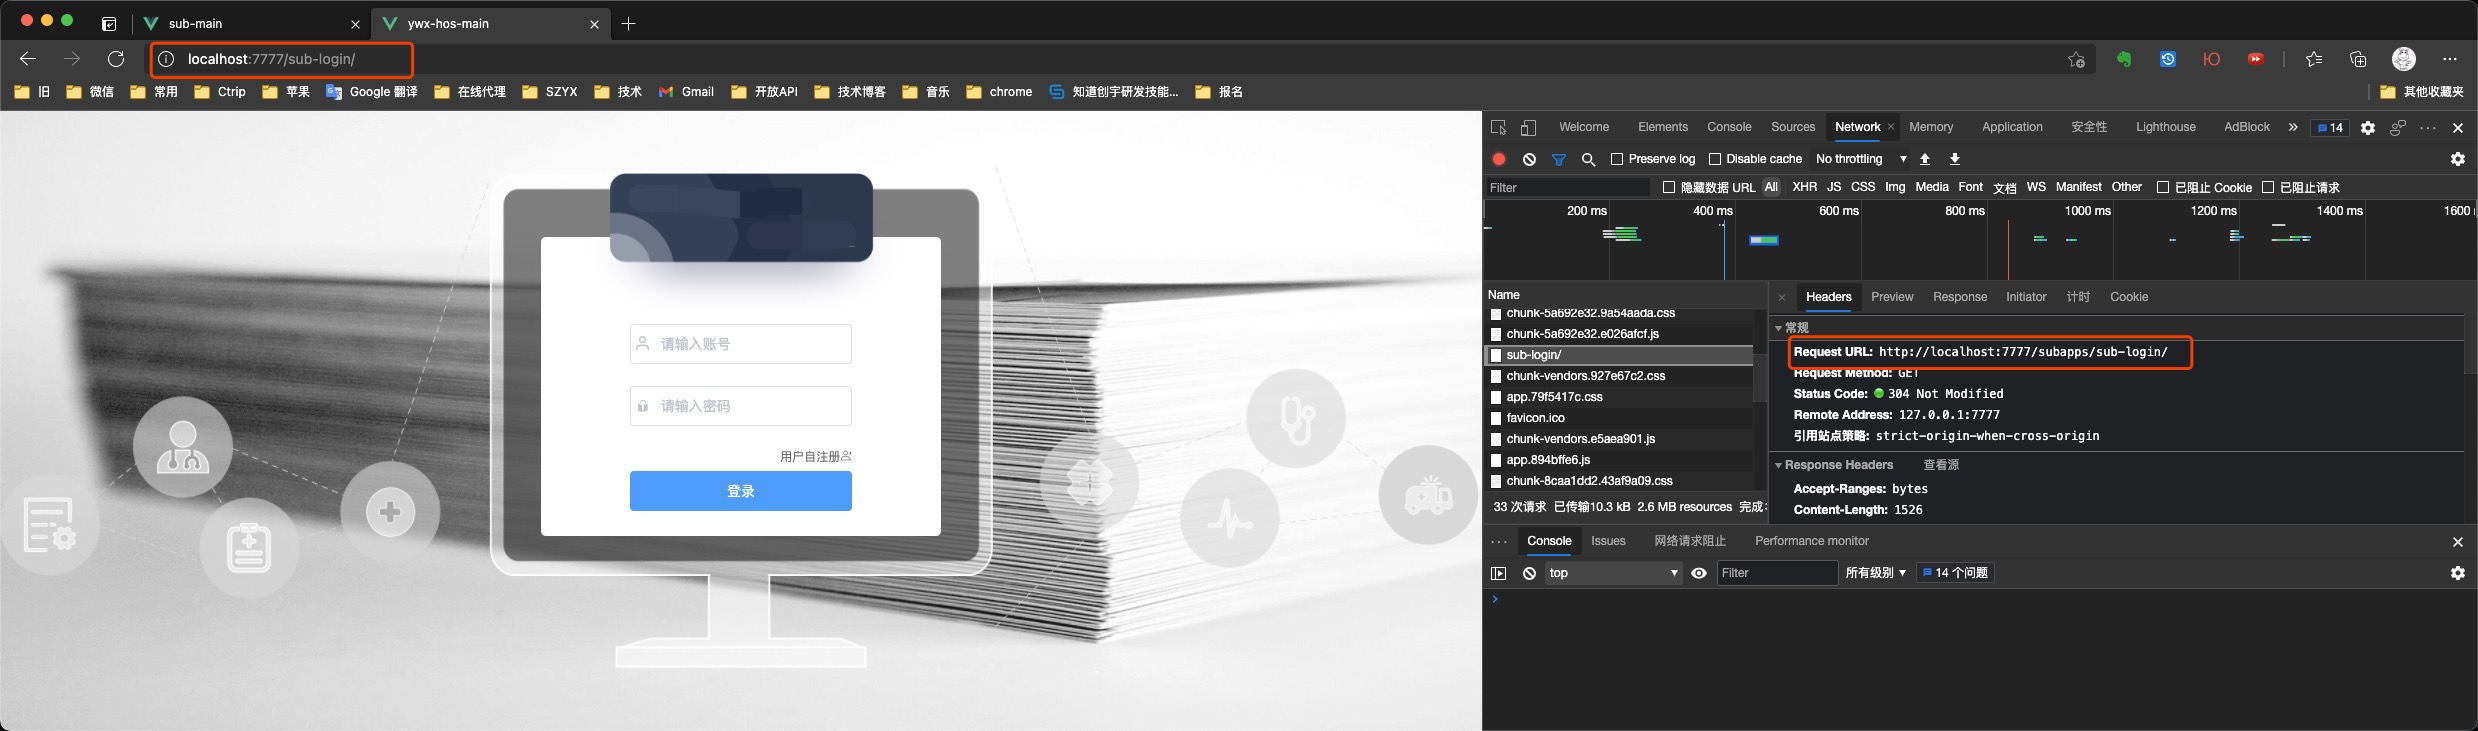
因此,在项目中,加载SUB_LOGIN这个子应用应当访问的地址为http://localhost:7777/subapps/sub-login/
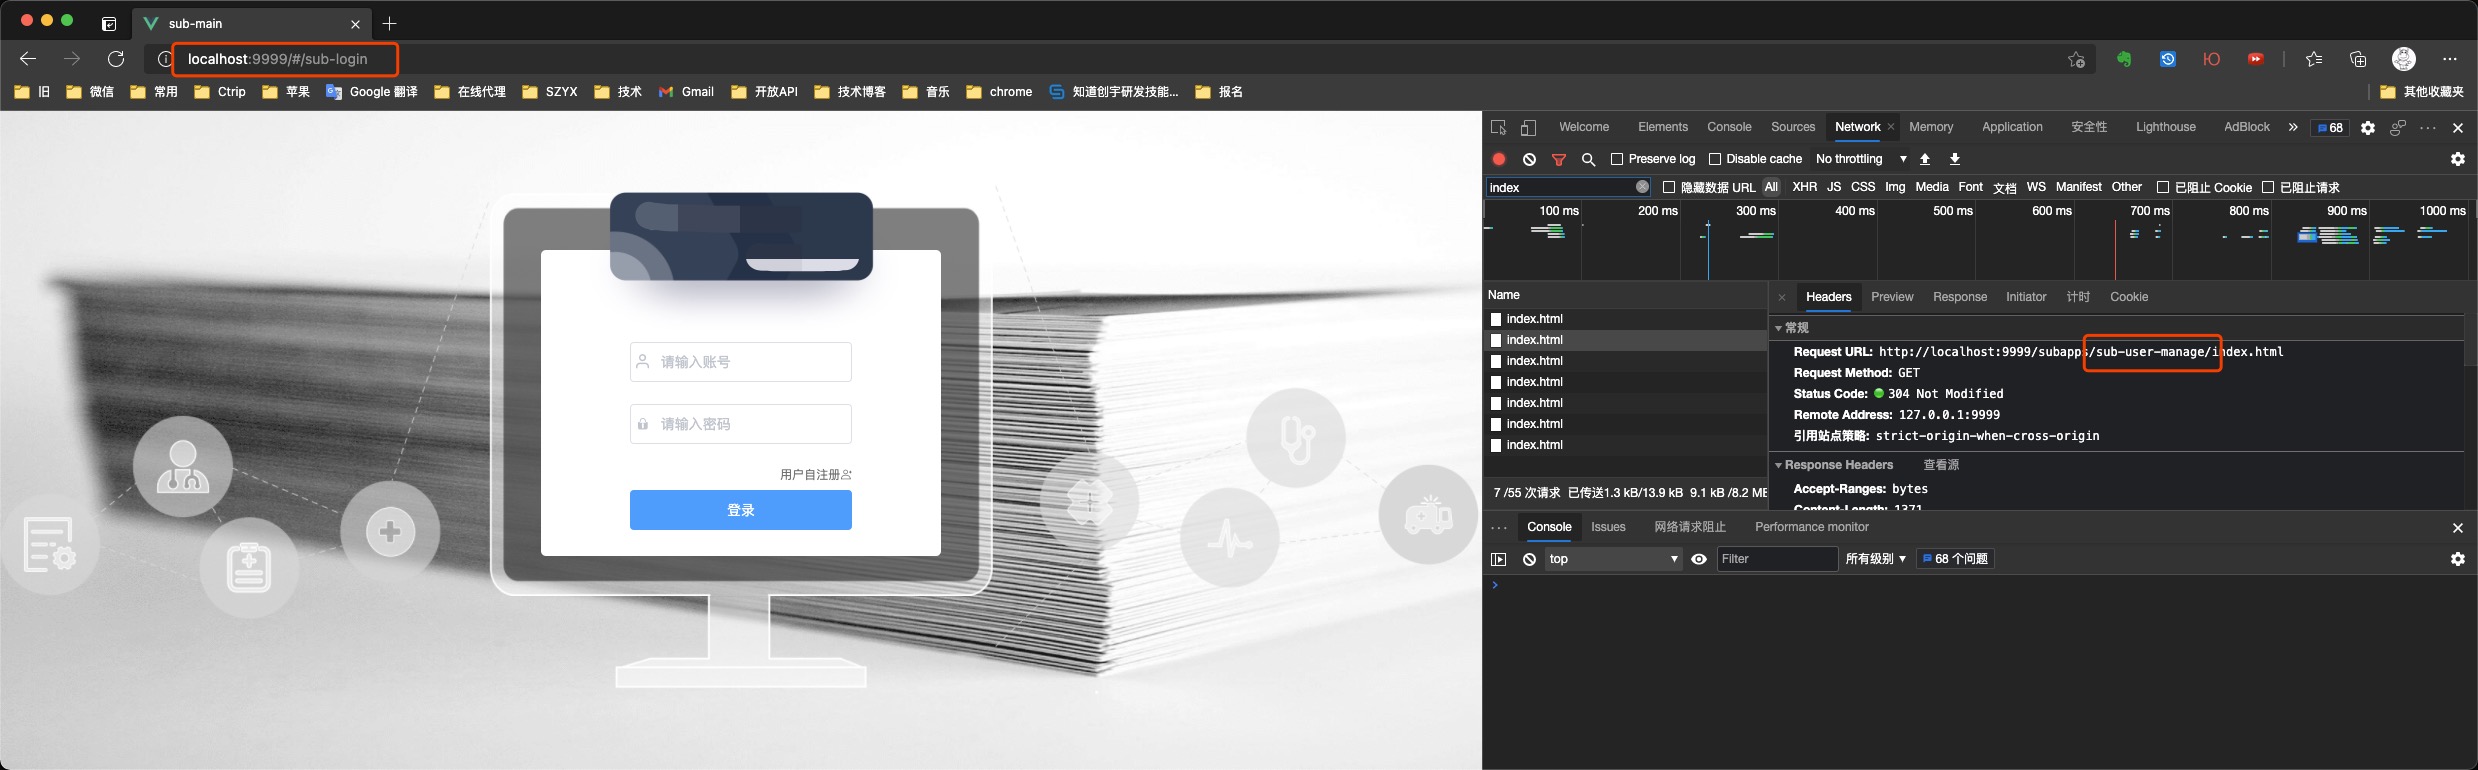
从nginx看我们配置的结果,访问http://localhost:7777/subapps/sub-login/ 等于 /Users/xing.wu/Desktop/deploy/subapps/sub-login/index.html
翻到图一看一下路径,就能发现,一切都对上了
效果如下
2.hash
1.nginx配置
一样,先是主应用
1
2
3
4
| location / {
root /Users/xing.wu/Desktop/deployhash/main;
index index.html index.htm;
}
|
访问http://localhost:9999/就等于访问了主应用/Users/xing.wu/Desktop/deployhash/main/index.html
再是子应用
1
2
3
4
| location /subapps {
root /Users/xing.wu/Desktop/deployhash;
index index.html index.htm;
}
|
访问http://localhost:9999/subapps/sub-login/ 等于 /Users/xing.wu/Desktop/deployhash/subapps/sub-login/index.html