我的GitHub
0%

无星的前端之旅(十四)——巧用plop生成模板进行偷懒

背景

在开发过程中,总会有一些模板代码需要编写,比如我是写vue的,vue2中的各种namespace,vue3中的各种引入。几乎是每个vue文件都需要的。

每次写都累的一批,也毫无技术含量。纯体力活,但还不得不做。

这时候大伙可能会用各自习惯的编辑器去编写各式各样的代码块来减轻工作量。

但是团队中编辑器并非统一的,众所周知,前端不仅语言众多,开发工具也多的一批,也没有什么好的跨编辑器跨机子的代码块存储方式(大厂统一云编辑器的往后稍稍,不包含你们)

这个时候就发现了plop(在跟着花裤衩手摸手学习vue-element-admin的时候学到的)。

Plop解决了什么问题?

解决了上述的同一个项目跨编辑器跨机器编写前端代码块的问题。

如何集成

一、集成plop到项目中

1
npm i plop -D

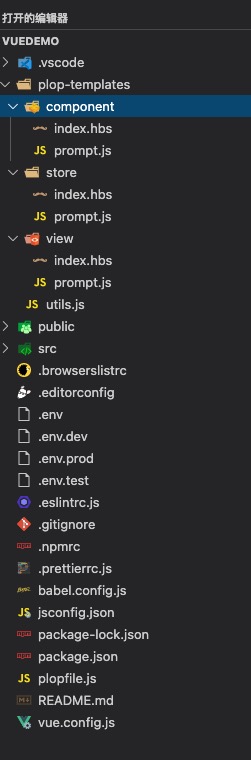
二、根目录下新建一个文件夹放置模板和脚本命令(这里只举个例子)

1
2
3
4
5
6
7
8
9
10
11
12
13
14
15
16
17
18
19
20
21
22
23
24
25
26
27
28
29
30
31
32
33
34
35
36
37
38
39
40
<!-- plop-templates/views/index.hbs -->

{{#if template}}
<template>
<div class="{{lowerCase name}}-main">
{{ properCase name }}
</div>
</template>
{{/if}}
{{#if script}}
<script>
export default {
name: '{{ properCase name }}',
components: {
},
props: {
},
data: () => ({
}),
computed: {},
watch: {},
created() {},
mounted() {},
beforeCreate() {}, // 生命周期 - 创建之前
beforeMount() {}, // 生命周期 - 挂载之前
beforeUpdate() {}, // 生命周期 - 更新之前
updated() {}, // 生命周期 - 更新之后
beforeDestroy() {}, // 生命周期 - 销毁之前
destroyed() {}, // 生命周期 - 销毁完成
activated() {},
methods: {},
};
</script>
{{/if}}
{{#if style}}
<style lang="less" scoped>
.{{lowerCase name}}-main{
}
</style>
{{/if}}
1
2
3
4
5
6
7
8
9
10
11
12
13
14
15
16
17
18
19
20
21
22
23
24
25
26
27
28
29
30
31
32
33
34
35
36
37
38
39
40
41
42
43
44
45
46
47
48
49
50
51
52
53
54
// plop-templates/views/prompt.js
const { notEmpty } = require('../utils.js');
module.exports = {
description: '新建一个页面',
prompts: [{
type: 'input',
name: 'name',
message: '页面名称',
validate: notEmpty('name'),
},
{
type: 'checkbox',
name: 'blocks',
message: '需要包含什么:',
choices: [{
name: '<template>',
value: 'template',
checked: true,
},
{
name: '<script>',
value: 'script',
checked: true,
},
{
name: 'style',
value: 'style',
checked: true,
},
],
validate(value) {
if (value.indexOf('script') === -1 && value.indexOf('template') === -1) {
return ' <template> 和 <script> 是必须的.';
}
return true;
},
},
],
actions: (data) => {
const name = '{{properCase name}}';
const actions = [{
type: 'add',
path: `src/views/${name}/index.vue`,
templateFile: 'plop-templates/view/index.hbs',
data: {
name,
template: data.blocks.includes('template'),
script: data.blocks.includes('script'),
style: data.blocks.includes('style'),
},
}];
return actions;
},
};

目录结构如图

1.png

三、根目录创建plop.js

这个是plop会读取的配置文件

1
2
3
4
5
6
7
8
9
// plopfile.js
const viewGenerator = require('./plop-templates/view/prompt');
const componentGenerator = require('./plop-templates/component/prompt');
const storeGenerator = require('./plop-templates/store/prompt');
module.exports = (plop) => {
plop.setGenerator('view', viewGenerator);
plop.setGenerator('component', componentGenerator);
plop.setGenerator('store', storeGenerator);
};

四、如何添加命令方便使用

在package.json 添加 script脚本

1
2
3
4
5
{
"scripts": {
"new": "plop"
},
}

五、如何使用

1
npm run new

效果图

2.gif

最后

我提供两套我自己使用的模板,分别是vue2和vue3的

vue2.zip

vue3.zip

注意:store是采用了module是分开自注册的,如果有兴趣,可以看这篇
无星的前端之旅(十三)——require.context和vuex持久化

我是阿星,阿星的阿,阿星的星!