无星的前端之旅(十四)——巧用plop生成模板进行偷懒
背景
在开发过程中,总会有一些模板代码需要编写,比如我是写vue的,vue2中的各种namespace,vue3中的各种引入。几乎是每个vue文件都需要的。
每次写都累的一批,也毫无技术含量。纯体力活,但还不得不做。
这时候大伙可能会用各自习惯的编辑器去编写各式各样的代码块来减轻工作量。
但是团队中编辑器并非统一的,众所周知,前端不仅语言众多,开发工具也多的一批,也没有什么好的跨编辑器跨机子的代码块存储方式(大厂统一云编辑器的往后稍稍,不包含你们)
这个时候就发现了plop(在跟着花裤衩手摸手学习vue-element-admin的时候学到的)。
Plop解决了什么问题?
解决了上述的同一个项目跨编辑器跨机器编写前端代码块的问题。
如何集成
一、集成plop到项目中
1 | npm i plop -D |
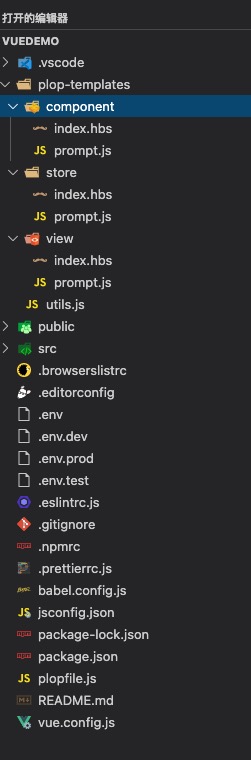
二、根目录下新建一个文件夹放置模板和脚本命令(这里只举个例子)
1 | <!-- plop-templates/views/index.hbs --> |
1 | // plop-templates/views/prompt.js |
目录结构如图
三、根目录创建plop.js
这个是plop会读取的配置文件
1 | // plopfile.js |
四、如何添加命令方便使用
在package.json 添加 script脚本
1 | { |
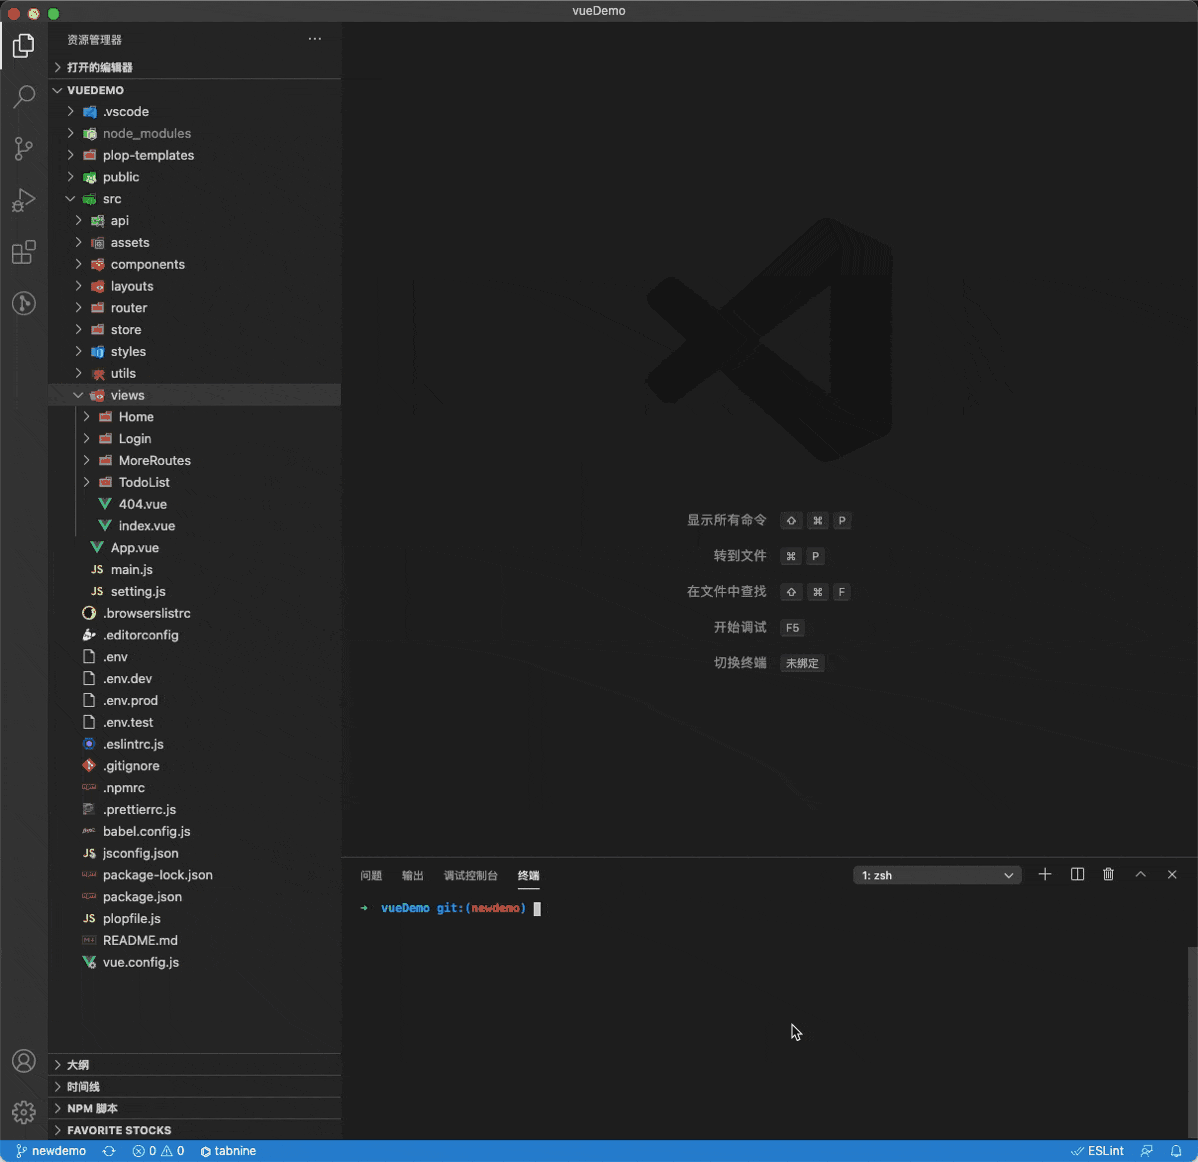
五、如何使用
1 | npm run new |
效果图
最后
我提供两套我自己使用的模板,分别是vue2和vue3的
注意:store是采用了module是分开自注册的,如果有兴趣,可以看这篇
无星的前端之旅(十三)——require.context和vuex持久化
本博客所有文章除特别声明外,均采用 CC BY-NC-SA 4.0 许可协议。转载请注明来源 歪比巴卜!
 微信
微信 支付宝
支付宝
相关推荐

2020-04-29
无星的前端之旅(三)——如何调试cli工程
作为前端开发工程师,希望搭建一些基础设置,cli是必不可少的一项。 至于cli如何制作,文章一大堆,相信网上大家都能搜到。 但是cli工具如何debug,我查了2天,都没查到。 我用的开发工具是vscode。虽然我知道答案一定在VSCode调试与NodeJS调试入门中,但我天资愚钝,不知道如何融合起来。 不过天不亡我,最终还是找到了解决方式。 不多bb,直接上代码和截图。 方式一1.新增vscode的launch选项卡 抄就完事了,注意端口号,是根据后续产生的端口号去填写,可以先填一个。 2.项目入口添加代码 1#!/usr/bin/env node --inspect-brk #!/usr/bin/env node是干什么用的大家一定都很熟悉,就不赘述了。 后面添加–inspect-brk,让它在启动的时候停滞。 3.进行debugger 这时候我们执行自己的cli命令(我这已经link过了,如何link就不多说了,百度都能查到) 1szyx-cli init aaa比如我这执行了一个init命令,大家可以看到,这里停滞了,并给出了...

2021-02-04
无星的前端之旅(十五)——babel初探
背景其实很早我就知道,babel会帮助我们做一件事,就是把高版本的ES语法,转换为低版本的ES语法,以确保在低版本浏览器上能正确运行。 但是一直我都不知道怎么去操纵它,只知道需要一堆配置,配合webpack可以做这件事(甚至我一度认为必须使用webpack才能做这件事)。 集成(基本就是抄文档)其实如果用百度搜索,集成的东西有各种es版本的依赖,配置文件有js,rc,json文件,乱七八糟什么都有。 其实这是历史原因。但现在已经2021年了,咱们就直接按官网说的来。 1.下载依赖包12npm install --save-dev @babel/core @babel/cli @babel/preset-envnpm install --save @babel/polyfill 当然,我个人认为,如果不需要兼容IE的话,应该不需要下载polyfill了 2.添加依赖文件在项目的根目录下创建一个命名为 babel.config.json 的配置文件(需要 v7.8.0 或更高版本),并将以下内容复制到此文件中: 123456789101112131415161718{ &...

2023-11-21
无星的前端之旅(二十八)-如何迁移npm包
背景我有一台外网电脑,还有一台内网电脑,内网的镜像源全靠人手工上传包,且平时几乎不更新,所以包的版本都很低。 我喜欢做一些简单的工具,仅自己使用,而且我喜欢用最新的版本,内部的源无法满足我的需求。 而且,我平时是使用pnpm管理。 那么接下来,我来介绍几种方式,以应对这个情况。 方式一针对使用yarn和npm包管理器的,非常简单,整个node_modules搬进去就行了。 方式二使用tar包 访问淘宝镜像站点https://npmmirror.com/ 搜索任意包,都能在右边发现一个tar包下载 点击下载,pnpm add xx.tar即可 但是这样有个问题,这个包的依赖包怎么办?实际上,我们可以先看一下依赖包 如果包A的依赖包不多的话,先将A的依赖包全部下载,然后解压缩A包,将package.json中的依赖修改为file:xxx路径的方式,详情可见无星的前端之旅(二十八)—— 离线安装npm库 那要是太多呢?咋整// TODO 未完待续

2024-07-05
无星的前端之旅(二十九)——vCard电子名片
背景最近同事给我发了一张“电子名片” 照片上有一个二维码 大伙可以用微信扫这个二维码看看 看看是不是很有意思 其实非常简单 大家只要搜索vCard 就能找到这个标准格式 不过标准都有点麻烦 以下是我这个二维码的生成内容 我使用的是3.0版本 12345678910111213BEGIN:VCARDVERSION:3.0URL:https://blog.xingxiaowu.cnPHOTO;TYPE=PNG;VALUE=URI:https://blog.xingxiaowu.cn/images/headerPic.pngFN;CHARSET=UTF-8:无星TEL;TYPE=CELL:110TEL;TYPE=WORK:110ORG;CHARSET=UTF-8:吹牛逼有限公司TITLE:董事长ADR;TYPE=WORK;UTF-8:宇宙大街11号EMAIL;TYPE=internet:chuiniubi@nc.comID:000000001##000000001END:VCARD 不过微信扫码有1个点要注意 微信扫描vCard格式的二维码为什么中文和URL(主页)共存就会无法成...

2025-04-15
无星的前端之旅(三十三)——pdfjs-dist怎么引入.md
报错引流1Error: No “GlobalWorkerOptions.workerSrc“ specified. 使用框架 vite pdf-js vue3 pnpm1pnpm add pdfjs-dist 使用页面文件 123456789import * as pdfjsLib from 'pdfjs-dist'// .....其他代码onMounted(() => { pdfjsLib.GlobalWorkerOptions.workerSrc = new URL( "pdfjs-dist/build/pdf.worker.min.mjs", import.meta.url ).toString(); // pdfjsLib.GlobalWorkerOptions.workerSrc = '../../node_modules/pdfjs-dist/build/pdf.worker.min.mjs';}) vite.config.ts新增配置 1234567891...

2020-09-04
无星的前端之旅(十)——多环境打包+命令行参数读取
背景多环境部署的时候总会有些参数需要写入 在vue-cli3创建的项目中可以通过webpack的配置文件写入 vue-cli4中没有了webpack配置文件,取而代之的事vue.config.js 实际上有两种方式可以完成这一需求 Mode模式这是vue-cli4提供的能力,通过创建 1.env.环境 方式创建不同环境下的不同配套参数 需要注意的是 只有以 VUE_APP_ 开头的变量会被 webpack.DefinePlugin 静态嵌入到客户端侧的包中。你可以在应用的代码中这样访问它们:1console.log(process.env.VUE_APP_SECRET) 命令行注入除了某些配套参数,可能还有些需要单独注入的参数,比如不同渠道id在Jenkins打包时可选用到。 这里直接举个例子 1.如何写入参数1234## 修改前打包npm run build:dev## 修改后打包npm run build:dev -x1 -x2 2.如何读取参数新建js文件,例如: 在项目根目录下新建config文件夹,新建environment.js 12345678910111213# ...
评论